How to Install Interior Door Molding
Interior door molding, also known as trim, adds a touch of elegance and sophistication to any room. It can help to cover up imperfections in the walls and doors, create a sense of visual interest, and even improve the acoustics of a space. While installing door molding may seem daunting, it is a relatively simple DIY project that can be completed with the right tools and techniques.
1. Preparing for Installation
Before beginning the installation process, it's essential to prepare the area appropriately. Start by gathering the necessary materials:
-
Interior door molding:
Choose a style that complements your existing décor and the size of your doors. Consider factors like wood type, thickness, and profile. -
Miter saw:
This is a specialized saw designed to make precise angle cuts, which are crucial for molding installation. -
Measuring tape:
Measure the length of each door and the width of the door jambs to determine the precise amount of molding needed. -
Pencil:
Mark your cuts on the molding for accuracy. -
Nail gun or hammer and finishing nails:
Nail guns provide a faster and more secure installation, while hammer and nails are suitable for smaller projects. -
Wood filler:
Used to patch any gaps or holes that may occur during installation. -
Sandpaper:
Smooth out rough edges or any imperfections in the wood. -
Caulk:
Seal any gaps between the molding and the wall or door jambs. -
Paint or stain (optional):
Customize the appearance of the molding to match your existing décor.
Once you have gathered all your materials, prepare the installation area. This includes removing any existing door trim, cleaning the walls and door jambs, and ensuring they are smooth and free of debris.
2. Measuring and Cutting the Molding
With the area prepared, begin measuring and cutting the molding. This is a crucial step that requires precision to create a seamless and professional-looking installation.
-
Measure the door jambs:
Carefully measure the length of each vertical jamb and the width of the horizontal jambs for accurate cuts. -
Account for corner angles:
For corner pieces, measure the angle of the corner and use a miter saw to cut the molding at a 45-degree angle. -
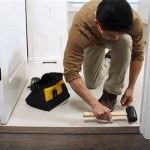
Cut the molding:
Use a miter saw for precise cuts, ensuring the blade is set to the correct angle for the specific piece of molding. Mark your cuts with a pencil for accuracy. -
Dry fit the pieces:
Before attaching the molding, dry fit the pieces together to ensure they fit perfectly. Make any necessary adjustments to ensure a seamless fit.
Take your time with this stage, as precise cuts are essential for a successful installation. A well-placed cut will minimize the need for filler at a later stage.
3. Installing the Molding
After cutting the molding, you can begin the installation process. This step requires careful placement and securing to ensure the molding is flush against the wall and door frame.
-
Start with the vertical jambs:
Begin by installing the molding that runs along the vertical door jambs, ensuring it is flush against the wall and door frame. -
Secure with nails or staples:
Nail the molding in place using a nail gun or hammer and finishing nails. Space nails evenly along the length of the molding for a secure fit. -
Install the horizontal jambs:
Once the vertical jambs are installed, attach the horizontal pieces that run along the top and bottom of the door frame. -
Fit the corner pieces:
Carefully fit the corner pieces into place, ensuring they are flush with both the vertical and horizontal pieces of molding. -
Use wood filler for gaps:
If there are any gaps between the molding and the wall or door frame, fill them with wood filler. Allow the filler to dry before sanding it smooth for a seamless finish.
When securing the molding, avoid driving nails too deep as this can damage the surface. Use a nail set to sink nails below the surface if necessary. Furthermore, use construction adhesive on the back of the molding to further enhance its stability and prevent movement over time.
4. Finishing Touches
Once the molding is installed, you can add the finishing touches. This includes sanding, caulking, and painting or staining the molding to match your desired aesthetic.
-
Sand the molding:
Use sandpaper to smooth out any rough edges or imperfections on the molding. -
Caulk any gaps:
Apply caulk to any gaps between the molding and the wall or door frame. This will create a smooth, seamless finish. -
Paint or stain the molding:
Optional: Customize the appearance of the molding by painting or staining it to match your existing décor. Allow the paint or stain to dry completely before applying any additional finishes.
This final step ensures a professional and polished look to your interior door molding installation. Ensure to use high-quality caulk and paint for a durable and long-lasting finish.

How To Install Door Casing

How To Replace Door Trim On A Pre Hung Carpentry

How To Install Door Trim The Home Depot

How To Install An Interior Door The Home Depot

How To Trim A Door In 10 Minutes

Installing A Prehung Interior Door Jamb Switch Rogue Engineer

How To Replace Door Trim On A Pre Hung Carpentry

Troubleshooting A Prehung Door Installation Fine Homebuilding

How To Add Trim Plain Doors The Painted Hive

How To Install Interior Doors And Trim Crown Base Building A 350 000 Custom House Ep 40
Related Posts