How To Install An Interior Door Without Frame
Installing an interior door without a pre-existing frame, sometimes referred to as installing a "slab door," presents a slightly more involved process than replacing a door within an existing frame. This task requires careful attention to detail and precision to ensure proper fit, alignment, and functionality. This article provides a comprehensive guide to installing an interior door without a frame, covering essential steps, tools, and techniques.
The decision to install a door without a frame typically arises when building a new partition wall, renovating an existing space, or when an old frame is damaged beyond repair or significantly out of square. While more demanding than a standard door replacement within an existing frame, installing a slab door offers greater customization and flexibility in design and sizing.
Before commencing the installation, meticulous planning and preparation are paramount. This includes accurately measuring the door opening, selecting the appropriate door slab, gathering necessary tools and materials, and ensuring the opening is properly prepared to receive the new door. Neglecting these initial steps can lead to complications and subpar results.
Key Point 1: Preparing the Door Opening and Selecting the Door Slab
The first, and arguably most crucial, step is preparing the door opening within the wall. This involves ensuring the opening is plumb (perfectly vertical) and level (perfectly horizontal). A laser level and a spirit level are indispensable tools for this task. Any discrepancies in plumb or level must be corrected before proceeding. This might involve shimming the studs or adding filler material to achieve a perfectly square and even opening.
After determining the plumb and level of the opening, accurate measurements must be taken. Measure the width and height of the opening at multiple points, as variations are common, especially in older structures. Use the narrowest width and the shortest height to determine the required dimensions of the door slab. It is crucial to err on the side of caution and choose a slightly larger door slab, as it is easier to trim a door than to add material.
Selecting the appropriate door slab is another critical consideration. Interior doors are available in a variety of materials, including solid wood, hollow core, and solid core. Solid wood doors offer superior durability and sound insulation but are significantly heavier and more expensive. Hollow core doors are lightweight and more affordable but provide minimal sound insulation and are less durable. Solid core doors offer a balance of durability, sound insulation, and cost. The choice depends on the intended application and budget.
Furthermore, consider the style and finish of the door slab. Doors come in a range of styles, from traditional paneled designs to modern flush designs. The finish can be raw, primed, or pre-finished. A raw door allows for complete customization of the finish, while a primed door is ready for painting. A pre-finished door is already painted or stained, saving time and effort. The selection should complement the overall aesthetic of the room.
When purchasing the door slab, carefully inspect it for any defects, such as warping, cracks, or blemishes. Ensure the door is square and true. Also, consider the direction of the door swing (left-hand or right-hand) and select a door that will swing in the desired direction. This is especially important if the door has pre-drilled holes for the hinges and the door handle.
Once you receive the door slab, let it acclimate to the environment for a few days to prevent warping. Lay it flat on a level surface, supported by shims, to allow it to adjust to the humidity and temperature of the room. This will minimize the risk of the door warping or shrinking after installation.
Key Point 2: Hanging the Door Slab
Hanging the door slab involves installing the hinges and ensuring the door swings smoothly and closes properly. This requires precise measurements, accurate drilling, and careful attention to alignment. A hinge mortise template and a router are highly recommended for creating clean and accurate hinge mortises.
Begin by marking the locations of the hinges on both the door slab and the door opening. Standard practice is to place one hinge 7 inches from the top of the door and another 11 inches from the bottom. A third hinge may be required for heavier doors, typically positioned in the middle of the door. Transfer the hinge locations to the door opening, ensuring they are aligned with the marks on the door slab.
Use a hinge mortise template and a router to create the mortises for the hinges on both the door slab and the door opening. A router provides a clean, precise mortise that perfectly matches the shape of the hinge. Alternatively, a chisel and hammer can be used, but this requires more skill and patience to achieve a professional result. The depth of the mortise should be equal to the thickness of the hinge leaf, allowing the hinge to sit flush with the surface of the door and the door jamb.
Once the mortises are prepared, attach the hinges to the door slab and the door opening using screws. Use screws that are long enough to penetrate deeply into the wood, providing a secure hold. Pre-drilling pilot holes is essential to prevent splitting the wood, especially when working with solid wood doors. Ensure the hinges are properly aligned and that the screws are tightened securely.
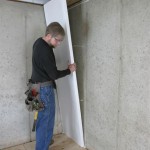
With the hinges installed, carefully lift the door slab into the opening and align the hinges. Insert the hinge pins to connect the door slab to the door opening. If the door is heavy, use a helper to assist in lifting and positioning the door. Check the door swing to ensure it operates smoothly and does not bind or rub against the door jamb.
If the door does not swing smoothly, adjust the hinges as needed. Loosen the screws on the hinges and use shims to adjust the position of the hinges. Tighten the screws after making the adjustments. Repeat this process until the door swings freely and closes properly. Minor adjustments may be required over time as the door settles.
Key Point 3: Installing the Door Hardware and Ensuring Proper Functionality
The final stage involves installing the door hardware, including the door handle, latch, and strike plate. This step requires precise measurements and careful attention to detail to ensure the door closes securely and latches properly. A door hardware installation kit can simplify this process and ensure proper alignment.
Begin by marking the location of the door handle on the door slab. Standard practice is to position the door handle approximately 36 inches from the floor. Use a hole saw to drill the hole for the door handle through the door slab. Follow the manufacturer's instructions for the specific door handle being installed.
Install the latch mechanism into the door slab, ensuring it is properly aligned with the hole for the door handle. The latch mechanism should operate smoothly and retract easily. Attach the door plates to the door handle and secure them with screws. Ensure the screws are tightened securely to prevent the door handle from loosening over time.
Next, install the strike plate on the door jamb, aligning it with the latch mechanism. The strike plate should be recessed into the door jamb, allowing the latch to engage fully and securely. Use a chisel and hammer to create the mortise for the strike plate. The depth of the mortise should be equal to the thickness of the strike plate, allowing it to sit flush with the surface of the door jamb.
Secure the strike plate to the door jamb with screws. Ensure the screws are long enough to penetrate deeply into the stud behind the door jamb, providing a secure hold. Test the door to ensure it closes properly and latches securely. If the door does not latch properly, adjust the position of the strike plate as needed. Loosen the screws on the strike plate and use shims to adjust its position. Tighten the screws after making the adjustments.
After installing the door hardware, test the door thoroughly to ensure it operates smoothly and latches securely. Check for any gaps around the door and adjust the hinges or strike plate as needed. Make any necessary adjustments to the doorstop to ensure the door closes tightly and prevents drafts. Lubricate the hinges and latch mechanism to ensure smooth operation.
Installing an interior door without a frame requires patience, precision, and attention to detail. By following these steps carefully, and utilizing the appropriate tools and techniques, a professional-looking installation can be achieved. While this process is more complex than replacing a door within an existing frame, the result is a custom-fitted door that enhances the functionality and aesthetics of the space.

How To Install An Interior Door Without A Frame

How To Install An Interior Door Without A Frame

How To Hang An Interior Door Tips And Guidelines Howstuffworks

How To Install An Interior Door A Erfly House

How To Install An Interior Door The Home Depot

Installing An Interior Door Rona

How To Install An Interior Door Easy Diy Guide

How To Install A Prehung Door Tips From Novice Addicted 2 Decorating

Installing An Interior Door Rona

How To Install An Interior Door Easy Diy Guide
Related Posts