Having a bowed interior wall can be a nightmare for homeowners. Not only is it unsightly, but it can also cause further damage to your home if it is not fixed quickly. Fortunately, there are a few steps you can take to address this issue and get your wall back to normal.
Step 1: Identify the Cause
Before you can begin to fix a bowed interior wall, you’ll need to identify the underlying cause of the issue. The most common causes of bowed walls are water damage, poor construction, or a settling foundation. If the cause is water damage, you’ll need to make sure any leaks have been repaired and the area is dry before you begin repairs.
Step 2: Ensure the Wall is Structurally Sound
Once you’ve identified the cause of the bowed wall, you’ll need to ensure that the wall is still structurally sound. If the wall is no longer stable, you’ll need to reinforce it before you can proceed with repairs. This may require replacing rotted or damaged wood, or installing support beams to ensure the wall is secure.
Step 3: Straighten the Wall
Once the wall is stable and secure, you can begin to straighten it. This may require using a pry bar to gently push the wall back into place. You may also need to add shims or wedges between the wall and the floor or ceiling to help hold it in place while the adhesive dries.
Step 4: Reinforce the Wall with Adhesive
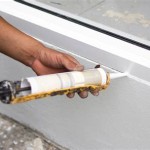
Once the wall is back in its original position, you’ll need to reinforce it with adhesive. You’ll need to use a construction adhesive designed for use on interior walls, such as epoxy or polyurethane. Be sure to cover the entire area of the wall, and use a caulking gun to apply the adhesive in a uniform manner.
Step 5: Finishing Touches
Once the adhesive is set, you’ll need to finish the job by adding finishing touches. This may include adding a layer of drywall mud or spackle to fill any gaps, or painting the wall with a fresh coat of paint. Once this step is complete, your wall should be back to looking and functioning as normal.


Related Posts


