Replacing the window trim in your home can be a great way to upgrade the look of your interior or update to a more modern style. With the right tools and materials, replacing window trim interior can be a relatively easy and straightforward process. This guide will help you understand what supplies you need, the steps involved in replacement, and some tips for better results.
Gather the Necessary Supplies
Before you start the process of replacing window trim interior, you’ll need to gather the necessary supplies. These include:
- Window trim of the desired size and style
- Caulk
- Putty knife
- Miter saw
- Wood glue
- Paint primer
- Paint brush
- Sandpaper
- Painter’s tape
Steps to Replace Window Trim Interior
Once you have all your supplies ready, you can begin the process of replacing window trim interior. Follow these steps:
- Remove the old trim. Carefully use a putty knife to pry off the old trim. If it is difficult to remove, use a hammer and chisel to help.
- Clean the area. Use a damp cloth to remove any dirt, dust, or debris from the area around the window.
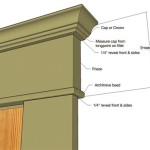
- Measure and cut the new trim. Use a miter saw to cut the new trim to size, making sure to leave a slight gap between each piece.
- Apply wood glue. Apply a thin layer of wood glue to the back of each piece of trim and the window.
- Apply the new trim. Carefully press the new trim into place, making sure it is properly aligned.
- Secure the trim. Nail the trim into place, making sure to nail through the trim and into the window frame.
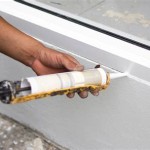
- Caulk. Use a caulking gun to apply caulk around the edges of the trim to ensure a tight and secure fit.
- Prime and paint. Use a paint primer to prepare the trim for painting, and then apply a coat of paint.
- Enjoy your new trim. Admire your handiwork and enjoy the new look of your interior windows!
Tips for Better Results
Here are some tips to keep in mind to get the best results when replacing window trim interior:
- Measure twice, cut once. Measure the dimensions of the window and trim carefully to ensure the trim fits correctly.
- Use painter’s tape. Use painter’s tape to protect the window frame from paint and caulking.
- Sand the trim. Sand the trim with sandpaper before painting to ensure a smooth finish.
- Paint the trim. Use a high-quality paint to provide protection and a beautiful finish.


Related Posts