How To Remove And Replace An Interior Door Frame With Glass
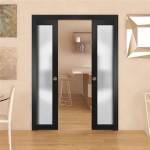
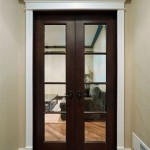
Replacing an interior door frame with one that incorporates glass can significantly alter the aesthetic of a room, enhancing natural light and creating a more open feel. This project, while achievable for experienced DIYers, requires careful planning, precision, and the right tools. This article outlines the necessary steps for safely removing an existing door frame and installing a new one designed to accommodate a glass panel or door.
Prior to commencing the removal and installation process, a thorough assessment of the existing door frame and the selected replacement is crucial. Measurements must be precise to ensure a proper fit. The type of wall construction (drywall, plaster, etc.) and the presence of any electrical wiring or plumbing within the wall cavity should be identified to avoid potential damage during the demolition phase.
Key Point 1: Preparing for the Removal
Preparation is paramount for a successful door frame replacement. Gather the required tools and materials before starting the demolition process. This includes:
*Safety glasses and gloves
*Utility knife
*Pry bar (various sizes)
*Hammer
*Screwdriver (both Phillips and flathead)
*Reciprocating saw (optional, but often helpful)
*Level
*Measuring tape
*Shims
*Construction adhesive
*Finishing nails or screws
*Caulk
*Wood filler (if needed)
*Sandpaper
*Paint or stain appropriate for the new door frame
Once tools and materials are ready, proceed with the following pre-removal steps:
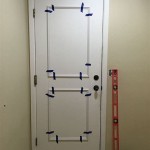
- Remove the existing door from its hinges. Store it safely to prevent damage.
- Using a utility knife, carefully score the paint or caulk along the perimeter of the existing door frame where it meets the wall. This will prevent the paint from peeling away from the wall during removal.
- Remove any trim or molding surrounding the door frame. Use a pry bar and hammer to gently detach the trim, working slowly to minimize damage to the wall. Start at the top and work your way down the sides.
The next phase involves the actual removal of the old door frame from the wall cavity. Caution is advised to avoid causing damage to the surrounding wall structure.
- Begin by identifying any fasteners securing the door frame to the wall. This may include nails, screws, or both. Remove all visible fasteners.
- Insert a pry bar between the door frame and the wall studs. Gently pry the frame away from the wall, working your way around the perimeter. If the frame is stubborn, use a reciprocating saw to cut through any hidden nails or screws. Take care not to cut into any wiring or plumbing within the wall.
- Once the frame is loosened, carefully pull it away from the wall. If the frame is in multiple pieces, remove them one at a time.
- Inspect the wall opening for any damage or debris. Remove any remaining nails, screws, or shims. Clean the opening thoroughly to prepare it for the new door frame.
The removal process may reveal inconsistencies or imperfections in the wall opening. These must be addressed before installing the new door frame to ensure a proper fit and a professional finish.
Examine the exposed wall studs for any signs of rot, damage, or misalignment. Replace or reinforce any damaged studs as needed. If the opening is not square or plumb, use shims to correct the imperfections. The goal is to create a level and square opening that will accommodate the new door frame without forcing or stress.
Key Point 2: Installing the New Door Frame with Glass
The installation of the new door frame with glass requires precision and attention to detail. Carefully unpack the new frame and inspect it for any damage. Ensure that all necessary components, including the glass panel or door, are present.
- Position the new door frame within the prepared wall opening. Ensure that it is centered and aligned properly.
- Use shims to level and plumb the door frame. Place shims behind the frame at the hinge locations, strike plate location, and at the top and bottom corners. Check the frame for squareness using a level and a measuring tape. Adjust the shims as needed until the frame is perfectly level, plumb, and square.
- Once the frame is properly aligned, secure it to the wall studs using screws or finishing nails. Drive the fasteners through the shims and into the studs. Be careful not to overtighten the fasteners, as this can distort the frame.
- Apply construction adhesive between the shims and the wall studs to provide additional support and stability.
The glass panel or door must be installed according to the manufacturer's instructions. This often involves inserting the glass into the frame and securing it with glazing beads or other retainers.
If the door frame is designed for a swinging glass door, install the hinges according to the manufacturer's specifications. Ensure that the hinges are properly aligned and securely attached to both the door frame and the door.
Test the operation of the door or glass panel to ensure that it swings smoothly and freely. Adjust the hinges or the frame as needed to correct any binding or misalignment.
Key Point 3: Finishing and Final Adjustments
Once the door frame is installed and the glass element is in place, the finishing touches can be applied to create a professional and aesthetically pleasing result.
- Trim any excess shims with a utility knife.
- Apply caulk along the perimeter of the door frame where it meets the wall. This will seal any gaps and prevent drafts. Choose a caulk that matches the color of the wall or the door frame.
- Install new trim or molding around the door frame. Use finishing nails or screws to attach the trim to the wall. Miter the corners of the trim for a clean and professional look.
- Fill any nail holes or imperfections in the trim with wood filler. Allow the filler to dry completely, then sand it smooth.
- Paint or stain the trim to match the door frame or the surrounding wall. Apply multiple coats of paint or stain, allowing each coat to dry completely before applying the next.
- Install the strike plate for the door latch. Ensure that the strike plate is properly aligned with the latch bolt so that the door closes securely.
- Install any necessary hardware, such as door knobs or handles.
A final inspection is crucial to identify any remaining issues or imperfections. Carefully examine the door frame, glass panel, and trim for any signs of damage, misalignment, or poor workmanship. Make any necessary adjustments or repairs to ensure a satisfactory finished product.
The functionality of the door should be verified. Check that the door opens and closes smoothly, latches securely, and does not bind or rub against the door frame. Adjust the hinges, strike plate, or door frame as needed to correct any problems. Also, inspect the caulk and trim for any gaps or imperfections. Touch up any areas that require attention.
Clean the glass panel with a glass cleaner and a soft cloth to remove any fingerprints, smudges, or debris. The surrounding wall area should be cleaned to remove any dust or debris that may have accumulated during the installation process.
In conclusion, replacing an interior door frame with one that incorporates glass involves careful planning, precise execution, and attention to detail. By following the steps outlined in this article, individuals can successfully complete this project and enhance the aesthetic appeal of their homes.

Removing Window Above Interior Door Diynot Forums

How To Replace Glass Above A Door Diy Instructions

The Easy Way To Remove A Door Frame And Make Money Ing It

How To Remove An Interior Door Frame

How To Replace A Door Frame Step By Guide

How To Cover Up Borrowed Lights Interior Windows Tea Cake For The Soul

How To Remove A Closet Door Frame

How To Replace An Interior Door Prehung Replacement Diy Family Handyman

Transoms For Interior Doors Jlc

How To Hang An Interior Door Tips And Guidelines Howstuffworks
Related Posts