Installing Interior Door Casing: A Step-by-Step Guide
Upgrading your home's interior doors with stylish casing can enhance the aesthetics and functionality of your space. This guide will provide you with step-by-step instructions on how to install interior door casing like a professional, ensuring a clean and polished finish.
Materials Required:
- Interior door casing
- Caulk gun and caulk
- Mitre saw or mitre box
- Carpenter's square
- Level
- Brad nailer and brad nails
- Hammer
- Screws (optional)
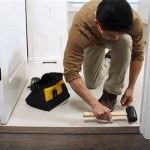
Step 1: Measure and Cut the Casing
Measure the width and height of the door opening. Transfer these measurements to the interior door casing and mark the cutting lines. Use a mitre saw or mitre box to cut 45-degree angles on the ends of the casing. Ensure the angles are precise for a seamless fit.
Step 2: Position the Casing
Align the top casing piece with the top of the door frame, ensuring it overhangs the door jamb by approximately 1/2 inch. Mark the position of the casing on the jamb with a pencil. Repeat this process for the other side of the door.
Step 3: Mark the Hinge and Lock Areas
Identify the locations of the door hinges and latch plate. Use a carpenter's square to transfer these measurements onto the casing. Mark the areas where the casing will need to be notched to accommodate the hardware.
Step 4: Notch the Casing
Use a utility knife or chisel to notch out the areas of the casing where the hinges and latch plate will be installed. Make sure the notches are deep enough to allow the hardware to fit flush against the casing.
Step 5: Attach the Casing to the Door Jamb
Apply a generous bead of caulk along the back of the casing, including the mitered corners. Position the casing in place against the door jamb and secure it with brad nails. Countersink the nails slightly below the surface of the casing using a hammer and nail set.
Step 6: Install the Side Casing
Measure and cut the side casing pieces to fit between the top and bottom casing. Mitre the ends at 45 degrees to create a seamless connection. Apply caulk to the mitered corners and nail the side casing in place, spacing the nails evenly.
Step 7: Secure the Corner Joints
For a more durable installation, reinforce the corner joints by applying small screws through the mitered edges.Countersink the screws slightly below the surface of the casing for a clean finish.
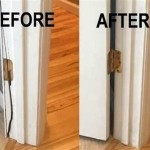
Step 8: Caulk and Finish
Caulk any gaps or seams between the casing and the door jamb or walls. Use a finger or caulk tool to smooth out the caulk for a professional appearance. Allow the caulk to cure completely before painting or finishing the casing.
Tips for a Successful Installation:
- Use a high-quality caulk that is paintable and flexible.
- Test the fit of the casing before nailing it in place.
- Countersink the nails and screws to prevent them from protruding.
- Use a level to ensure the casing is installed straight and plumb.
- Paint or finish the casing to match your door and trim for a cohesive look.

How To Install Door Casing

How To Install Window Door Trim Casing Made Simple

Tip For Installing Door Casing Concord Carpenter

How To Install Interior Door Casing On A Pocket

How To Install Door Casing

How To Trim A Door In 10 Minutes

How To Hang An Interior Door Tips And Guidelines Howstuffworks

French Door Makeover Part Two Diy Casing

How To Install Door Casing

Installing A Prehung Interior Door Jamb Switch Rogue Engineer
Related Posts