Foam board insulation is an effective way to insulate your home, saving you money on your energy bills. Installing foam board insulation on interior walls is a relatively easy and affordable project that can be completed in a few hours. Here’s a step-by-step guide on how to install foam board insulation on your interior walls.
Step 1: Select and Purchase the Insulation
The first step to installing foam board insulation is selecting the right type of insulation for your project. There are several types of foam board insulation available, including expanded polystyrene (EPS) foam, extruded polystyrene (XPS) foam, and polyisocyanurate (PIR) foam. Choose the type of insulation that best meets your needs based on the R-value, the thickness, and the cost.
Step 2: Prepare the Wall
Before you can install the insulation, you’ll need to prepare the wall. Start by removing any existing insulation, then fill any cracks or holes with caulk or foam filler. Use a stud finder to locate any studs in the wall, then mark them with a pencil. If you’re installing the insulation around electrical outlets or other fixtures, use a utility knife to cut out the necessary openings.
Step 3: Measure and Cut the Insulation
Once the wall is prepared, measure and cut the insulation to fit. Use a straight edge and a sharp utility knife to make precise cuts. If you’re installing the insulation around electrical outlets or other fixtures, use the utility knife to cut out the necessary openings.
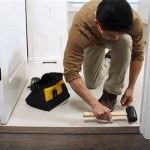
Step 4: Install the Insulation
Once the insulation is cut, you can start installing it on the wall. Start by applying a bead of adhesive caulk along the edges of the wall, then press the insulation into place. Use a roller or your hands to press the insulation firmly against the wall. Make sure to press the insulation firmly around any electrical outlets or other fixtures. Finally, use a utility knife to trim off any excess insulation.
Step 5: Seal the Insulation
Once the insulation is installed, you’ll need to seal it. Start by applying a bead of caulk along any seams or gaps in the insulation. Then, use a paint roller to apply a coat of waterproof sealant to the entire surface of the insulation. This will help prevent moisture from getting into the insulation and damaging it.
Step 6: Enjoy the Savings
Once the insulation is installed and sealed, you can enjoy the savings on your energy bills. Foam board insulation is an effective and affordable way to make your home more energy efficient and save money on your utility bills. Enjoy the comfort and savings that come with a well-insulated home.


/RigidFoamInStudWallSystem-56ed84e53df78ce5f836fe4a.jpg)


/man-installing-insulation-182186960-583dfbb05f9b58d5b170a0ee.jpg)


Related Posts