How To Install a Prehung Interior Door in New Construction
Installing a prehung interior door in new construction is a fundamental skill for carpenters and DIY enthusiasts alike. A prehung door offers convenience as it comes already assembled within its own frame, simplifying the installation process compared to installing a door slab alone. This article provides a detailed, step-by-step guide on how to properly install a prehung interior door during the construction phase, ensuring a professional and functional result.
Before commencing any work, it is crucial to gather the necessary tools and materials. This preparation streamlines the installation process and minimizes potential delays. The accuracy of measurements directly impacts the final product; therefore, precise measurements are paramount.
The following tools are typically required:
*Level (4-foot and torpedo level)
*Tape measure
*Hammer
*Wood shims
*Utility knife
*Drill/driver with various bits (including a countersink bit)
*Screws (various lengths, typically 2 1/2" and 3")
*Nail gun (optional, but recommended for efficiency)
*Safety glasses
*Work gloves
*Pry bar
*Wood glue (optional)
*Construction adhesive (optional)
*Caulk (paintable)
The following materials are needed:
*Prehung interior door
*Interior trim (casing)
*Finishing nails
*Wood filler
*Paint or stain (to match existing trim or desired aesthetic)
Prior to starting the installation, carefully inspect the prehung door for any damage incurred during shipping or handling. Verify that the door swings in the correct direction and that the dimensions of the door frame align with the rough opening.
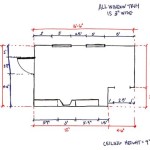
Preparing the Rough Opening
The rough opening is the framed opening in the wall where the door frame will be installed. The dimensions of the rough opening are critical for a proper fit. As a general rule, the rough opening should be approximately 2 inches wider and 2 inches higher than the outside dimensions of the prehung door frame. This allows for adjustments and shimming to ensure the door is plumb and level.
Before installing the door, inspect the rough opening for any obstructions, such as protruding nails or debris. Remove any such obstacles to ensure a smooth and flush surface. Check the trueness of the studs and header forming the rough opening. Use a level to ensure the studs are plumb and the header is level. If necessary, use shims to correct any minor imperfections. Securing the shims with fasteners to the framing members will help maintain proper alignment during door installation.
Ensure the floor is level where the door will swing. Uneven flooring can cause issues with door operation. If the floor is significantly uneven, adjustments may be required, such as adding shims under the door frame or planing the bottom of the door.
Installing the Prehung Door
With the rough opening prepared, carefully position the prehung door into the opening. It is often helpful to have an assistant to help lift and maneuver the door, especially for heavier solid-core doors. Center the door in the opening from side to side. Use shims between the door frame and the studs to achieve a plumb and level installation. Start by placing shims at the top hinge, middle hinge, and bottom hinge locations on the strike side (the side where the door latches). Ensure these shims are snug but not overly tight, as excessive force can distort the door frame.
Use a level to check the hinge side of the door frame for plumb. Adjust the shims as needed until the frame is perfectly plumb. Once plumb, drive screws through the frame and into the studs behind the shims. Countersink the screws to allow for a flush surface when installing the trim. Long screws are preferable as they secure into the framing members better than shorter screws. The top hinge is a key area to use a longer screw, as it bears a significant amount of weight.
Next, focus on the strike side of the door. Place shims behind the strike plate location and at several other points along the frame. Use a level to ensure the strike side is plumb and aligned with the hinge side. Adjust the shims as necessary to achieve a consistent gap between the door and the frame. Drive screws through the strike side frame and into the studs behind the shims, ensuring the screws are countersunk.
Check the door for proper operation. The door should swing smoothly and freely without binding or rubbing against the frame. If the door is binding, identify the area of contact and adjust the shims accordingly. Minor adjustments to the hinge screws can also help fine-tune the door's alignment. Open and close the door several times to ensure the latch engages properly with the strike plate. Adjust the strike plate if necessary to ensure a secure and reliable latch. Once the door is operating smoothly, use a utility knife to trim any excess shims flush with the door frame.
Finishing the Installation
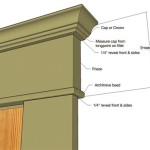
With the door properly installed and functioning smoothly, the final step is to install the trim (casing) around the door frame. The trim conceals the gaps between the door frame and the wall, providing a finished and aesthetically pleasing appearance.
Measure and cut the trim pieces to fit around the door frame. Use a miter saw to create accurate 45-degree angles for the corners. Apply a small bead of wood glue to the back of the trim where it will contact the door frame and the wall. Position the trim carefully and secure it with finishing nails. Use a nail set to countersink the nails below the surface of the trim. For larger gaps between the trim and the wall, construction adhesive can be used in conjunction with finishing nails to provide a more secure bond.
Once the trim is installed, fill the nail holes with wood filler. Allow the filler to dry completely, then sand it smooth with fine-grit sandpaper. Caulk the gaps between the trim and the wall, as well as any gaps between the trim pieces themselves. Use a paintable caulk that matches the color of the trim. Smooth the caulk bead with a wet finger or a caulk smoothing tool. Finally, paint or stain the trim to match the existing trim in the room or to achieve the desired aesthetic. Apply multiple coats of paint or stain as needed to achieve a uniform and durable finish.
Clean up any debris and dispose of any waste materials properly. Inspect the finished installation to ensure a professional and functional result. The door should operate smoothly, the trim should be securely attached, and the finish should be uniform and aesthetically pleasing.

How To Install A Prehung Door Making Maanita

Installing A Prehung Interior Door Jamb Switch Rogue Engineer

Installing A Pre Hung Door The Easy Way And T Out Aka Adding Molding Make It Love

The Foolproof Door Hanging Method

How To Hang An Interior Door Tips And Guidelines Howstuffworks

How To Replace An Interior Door Prehung Replacement Diy Family Handyman

Diy Tutorial How To Install A Prehung Door Build It With Baird

Installing A Prehung Interior Door Jamb Switch Rogue Engineer

Tips On How To Install A Pre Hung Door Bestcabinets

How To Install A Prehung Door
Related Posts