How to Clean a Car's Interior
Maintaining a clean car interior is crucial for several reasons. It enhances the driving experience, prevents the buildup of allergens and bacteria, and helps preserve the vehicle's resale value. Regular interior cleaning can also address potential issues like stains and odors before they become permanent problems. This article provides a comprehensive guide to cleaning a car's interior, covering essential steps and techniques.
Preparation and Gathering Supplies
Before commencing the interior cleaning process, it is important to gather the necessary supplies and prepare the vehicle. This initial stage ensures efficiency and a thorough cleaning outcome. A well-stocked cleaning kit and a systematic approach are key to a successful cleaning endeavor.
The initial step involves removing all loose items from the car's interior, including trash, personal belongings, and floor mats. This action provides unobstructed access to all surfaces and prevents damage to these items during the cleaning process. Dispose of any waste materials properly and set aside personal items for later placement back in the vehicle.
Next, gather the appropriate cleaning supplies. Essential items include a vacuum cleaner with various attachments, microfiber cloths, interior cleaner, glass cleaner, upholstery cleaner, leather cleaner (if applicable), detailing brushes, and a trash receptacle. Having these supplies readily available streamlines the cleaning process and ensures the ability to address various types of messes and surfaces.
Selecting the right cleaning products is vital. Choose products specifically designed for automotive interiors to avoid damaging sensitive materials like leather, vinyl, and plastic. Always test any new cleaning product on an inconspicuous area first to ensure it does not cause discoloration or damage. Opt for pH-neutral cleaners whenever possible, as they are generally safer for a wider range of surfaces.
Furthermore, prepare the car for cleaning by opening all doors and windows to ensure adequate ventilation. This step helps to dissipate any lingering odors and allows cleaning solutions to dry more quickly. If possible, park the car in a shaded area to prevent the sun from causing cleaning products to dry too rapidly, which can leave streaks and residue.
Vacuuming the Interior
Vacuuming is a fundamental step in cleaning a car's interior. It removes loose dirt, dust, crumbs, and other debris from carpets, upholstery, and crevices. A thorough vacuuming job lays the foundation for more detailed cleaning procedures and significantly improves the overall cleanliness of the interior.
Start by vacuuming the carpets and floor mats. Use a vacuum cleaner with a strong suction and a brush attachment to loosen embedded dirt and debris. Pay particular attention to areas that experience high traffic, such as the driver's and passenger's footwells. Remove the floor mats and vacuum them separately, shaking them out first to remove larger particles.
Next, vacuum the upholstery, including the seats, headrests, and door panels. Use a vacuum attachment with a soft brush to avoid scratching or damaging the material. For crevices and tight spaces, use a crevice tool attachment to reach dirt and debris that are difficult to access with larger attachments. Be sure to vacuum along the seams and edges of the seats, where dirt tends to accumulate.
Vacuum the dashboard, center console, and other hard surfaces using a soft brush attachment. This removes dust and debris without scratching the surfaces. Pay attention to vents, buttons, and other intricate areas where dust can accumulate. A small detailing brush can be used to dislodge dust from these hard-to-reach spots.
After vacuuming, inspect the interior for any remaining dirt or debris. If necessary, repeat the vacuuming process to ensure all surfaces are thoroughly cleaned. A well-vacuumed interior provides a clean and refreshed starting point for further cleaning procedures.
Cleaning and Treating Surfaces
Once the interior has been thoroughly vacuumed, proceed with cleaning and treating surfaces. This involves addressing specific areas such as the dashboard, console, upholstery, and windows, using appropriate cleaning products and techniques. This step removes stains, grime, and other contaminants, leaving the interior looking and smelling fresh.
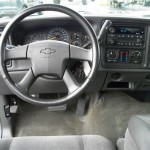
Begin by cleaning the dashboard and console using an interior cleaner and a microfiber cloth. Spray the cleaner onto the cloth, not directly onto the surface, to avoid oversaturation. Wipe down the dashboard and console, paying attention to areas that are frequently touched, such as the steering wheel, gear shift, and radio controls. Use a detailing brush to clean vents and other intricate areas.
For upholstery, use an upholstery cleaner specifically designed for the material of your seats. Test the cleaner on an inconspicuous area first to ensure it does not cause discoloration or damage. Spray the cleaner onto the upholstery and use a soft brush to gently scrub the surface. Wipe off the cleaner with a clean, damp microfiber cloth. For stubborn stains, repeat the process or use a dedicated stain remover.
If the car has leather seats, use a leather cleaner and conditioner to clean and protect the material. Apply the cleaner to a microfiber cloth and gently wipe down the seats. Follow with a leather conditioner to moisturize the leather and prevent cracking. Buff the seats with a clean, dry microfiber cloth to restore their shine.
Clean the windows and mirrors using a glass cleaner and a microfiber cloth. Spray the cleaner onto the cloth and wipe down the glass surfaces. Use a separate, clean microfiber cloth to dry the glass and remove any streaks. Pay attention to the corners and edges of the windows, where dirt and grime tend to accumulate.
For door panels, use an interior cleaner and a microfiber cloth. Wipe down the panels, paying attention to areas that are frequently touched, such as the door handles and armrests. Use a detailing brush to clean any textured surfaces or crevices. If the door panels have any scuff marks, use a plastic restorer to remove them.
Finally, clean the floor mats using an all-purpose cleaner and a scrub brush. Remove the mats from the car and spray them with the cleaner. Scrub the mats with the brush to remove dirt and stains. Rinse the mats with water and allow them to dry completely before placing them back in the car. Consider using a rubber protectant to keep the mats looking new.
Special Considerations for Specific Materials
Different materials within a car's interior require specific cleaning approaches to prevent damage and ensure optimal results. Understanding the properties of each material and using appropriate cleaning products is crucial for maintaining the interior's appearance and longevity.
Leather requires gentle cleaning and conditioning to prevent cracking and fading. Use a dedicated leather cleaner and conditioner specifically formulated for automotive use. Avoid using harsh chemicals or abrasive cleaners, as these can damage the leather's surface. Regularly condition the leather to keep it supple and prevent it from drying out.
Fabric upholstery can be prone to staining and requires prompt attention to prevent stains from setting. Use an upholstery cleaner designed for automotive use and follow the manufacturer's instructions carefully. For stubborn stains, consider using a specialized stain remover. Avoid oversaturating the fabric, as this can lead to mildew growth.
Vinyl and plastic surfaces are relatively durable but can be susceptible to scratches and discoloration. Use an interior cleaner specifically designed for vinyl and plastic and avoid using abrasive cleaners or scrub brushes. Protect vinyl and plastic surfaces from direct sunlight to prevent fading and cracking.
Carpets can accumulate dirt, debris, and stains and require regular vacuuming and occasional deep cleaning. Use a vacuum cleaner with a strong suction and a brush attachment to remove loose dirt and debris. For stubborn stains, use a carpet cleaner and follow the manufacturer's instructions carefully. Consider using a carpet protector to prevent future stains.
Glass surfaces require streak-free cleaning to ensure optimal visibility. Use a glass cleaner specifically designed for automotive use and avoid using paper towels, which can leave streaks. Use a clean, microfiber cloth to wipe down the glass surfaces and ensure they are completely dry.

Diy 4 Step Headlight Cleaner Diyproject Carcleaning Cars Head Car Tiktok

7 Types Of S To Avoid When Detailing Interiors

And Compact Vax Spotwash Interior Car Cleaning Demo Review

Car Interior Modification In 3 Easy Steps Pegasus Premium

Car Interior Modification In 3 Easy Steps Pegasus Premium

2024 Guide The Beginner S To Car Detailing Like A Pro

Car Interior Modification In 3 Easy Steps Pegasus Premium

The Best New Car Interiors For 2024 Road Track
The Best New Car Interiors For 2024 Road Track

How To Clean Leather Car Seats
Related Posts