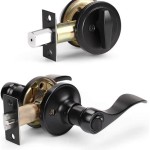
How to Change an Interior Door Knob
Whether you're refreshing your home's décor or replacing a faulty doorknob, changing an interior doorknob is a relatively simple task that can be completed in a few easy steps. Here's a comprehensive guide to help you change an interior doorknob with ease:
Tools and Materials Required
- New interior doorknob
- Screwdriver (Phillips or flathead)
- Latch strike plate (optional)
- Drill (if installing a new strike plate)
Safety Precautions
Before you start, take these safety precautions to ensure a smooth and hazard-free process:
- Wear safety glasses to protect your eyes from any flying debris.
- If you're working on a high door, use a step stool or ladder for stability.
- Remove any jewelry or loose clothing that could get caught on the doorknob or tools.
Step-by-Step Guide
1. Remove the Old Doorknob
Locate the two small screws that secure the doorknob to the door. Using the appropriate screwdriver, carefully remove these screws. Keep them safe as you'll need them later.
Gently pull the doorknob away from the door. If it doesn't come off easily, wiggle it slightly while pulling.
2. Remove the Latch
Once the doorknob is removed, you'll see the latch assembly. It's the metal piece that engages with the strike plate on the door frame.
Locate the screws that secure the latch to the door and remove them. Pull the latch straight out of the door.
3. Install the New Latch (Optional)
If the new doorknob came with a new latch, you may need to install it. Align the new latch with the holes in the door and secure it with the screws provided.
Make sure the latch is positioned correctly. It should extend about 1/8 inch beyond the edge of the door.
4. Install the New Doorknob
Insert the spindle of the new doorknob into the hole in the door. Push the doorknob firmly into place until it sits flush against the door.
Secure the doorknob with the screws you removed earlier. Tighten the screws securely, but avoid overtightening.
5. Install the Strike Plate (Optional)
If you're installing a new doorknob that requires a different strike plate, mark the position of the latch on the door frame.
Using a drill, create a hole for the strike plate's screws. Place the strike plate over the holes and secure it with the screws provided.
6. Test the Doorknob
Once the doorknob is installed, test it to ensure it works correctly. Open and close the door several times to check the latch engagement and smoothness of operation.
If the doorknob feels loose or doesn't latch properly, adjust the latch strike plate until it aligns perfectly with the latch.
Conclusion
Congratulations! You've successfully changed an interior door knob. With a little patience and attention to detail, it's a task that can be completed with ease. Remember to take safety precautions, gather the necessary tools and materials, and follow the steps carefully.

How To Replace A Door Knob Without Visible S

Updating Interior Doors By Installing New Doorknobs Young House Love

Ready For A Quick Home Update Change Your Doorknobs
:strip_icc()/102023540-e05acf28c3b6429f925033b374479d9b.jpg?strip=all)
How To Change A Doorknob Quickly For An Updated Look

How To Replace An Interior Doorknob 15 Steps With Pictures

How To Replace An Interior Door Handle Premium Hardware

Updating Interior Doors By Installing New Doorknobs Young House Love

How To Install A Door Knob

Remove Kwikset Interior Door Knob With No S Diy

How To Change A Doorknob The Honeycomb Home
Related Posts


