Framing an Interior Wall with Door Opening and Closing Time Considerations
The construction of interior walls is a fundamental aspect of residential and commercial building. A well-framed wall provides structural support, defines spaces, and accommodates utilities. This article details the process of framing an interior wall, specifically incorporating a door opening, and emphasizes the importance of considering the operational characteristics and associated space requirements – specifically the "door opening and closing time" – during the design and construction phases.
Framing involves assembling a network of wooden or metal studs, plates, and headers to create a rigid structure within a building. This skeletal framework is then sheathed with drywall or other finishing materials to form the visible wall surface. Accuracy and adherence to building codes are paramount to ensure the structural integrity, safety, and longevity of the wall.
Before commencing any framing work, it is crucial to ascertain relevant building codes and regulations. Local authorities often have specific requirements regarding stud spacing, header sizes, fire resistance, and accessibility. Failing to comply with these regulations can result in costly rework and delays. Consulting with a qualified structural engineer or building inspector can provide valuable guidance.
Planning and Layout
The initial stage of wall framing involves meticulous planning and layout. This starts with accurately marking the wall's location on the floor, ceiling, and adjacent walls. A chalk line is typically used to create these reference lines. The location of the door opening must be precisely indicated, factoring in the door's width, swing direction, and any required clearances. In this planning stage, considering the "door opening and closing time" is crucial. Faster closing doors may require more clearance to avoid striking objects or people. Slower closing doors might affect the flow of traffic within the space, especially in high-traffic areas.
Door swing direction dictates hinge placement and influences the usability of the surrounding space. The swing should be designed to minimize obstruction and maximize accessibility. Regulations pertaining to accessibility, like those outlined in the Americans with Disabilities Act (ADA), may mandate minimum clearances and swing directions for certain doors. The door's hardware, including hinges, handles, and locking mechanisms, should also be pre-selected to ensure compatibility with the frame and planned usage. Beyond the immediate door opening, consideration must be given to the space the door occupies throughout its full range of motion.
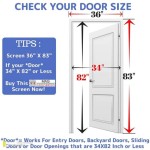
Furthermore, a rough opening must be created that is larger than the intended door size. This “rough opening” is slightly larger than the door frame, typically by 2-3 inches in both width and height, to allow for shimming and adjustment during installation. The planned finish flooring thickness needs to be considered when determining the precise height of the rough opening to ensure the door swings freely over the finished floor surface. Accurate measurement and marking at this stage will prevent future problems and ensure a professional final product.
Framing the Wall
Once the layout is complete, the framing process can begin. Typically, lumber, such as 2x4 studs, is used for interior walls. The top and sole plates, which run horizontally along the floor and ceiling, are cut to the wall's length. The studs, which run vertically between the plates, are then cut to the appropriate length, less the combined thickness of the top and sole plates. Standard stud spacing is typically 16 inches on center (OC), but this may vary depending on local building codes and structural requirements. In areas requiring increased structural support or fire resistance, stud spacing may be reduced to 12 inches OC.
The frame is assembled by nailing or screwing the studs to the top and sole plates. Use appropriate fasteners (nails or screws) that comply with local building codes. A pneumatic nail gun is often used for speed and efficiency, but hand-driving nails or using a screw gun is also acceptable. It is essential to ensure that all connections are secure and that the frame is square. A framing square is used to verify that corners are at right angles. Correct alignment is critical to avoid problems during sheathing and finishing.
The door opening requires special attention. A header, which is a horizontal beam spanning the opening, must be installed to carry the load above the door. The size of the header depends on the width of the opening and the load it must support. Larger openings and load-bearing walls require larger headers. Headers are typically constructed of two pieces of lumber sandwiched together, with a spacer in between to achieve the desired thickness. Jack studs (also called trimmer studs) are placed on either side of the door opening to support the header. These studs run from the sole plate to the header and provide vertical support.
Cripples studs, which are short studs placed above the header and below the sill plate (horizontal member at the top of a non-load-bearing wall), fill the remaining space between the header and top plate, and sole plate. These cripple studs maintain the standard stud spacing and provide a nailing surface for sheathing.
Incorporating "Door Opening and Closing Time" Considerations
The "door opening and closing time" – the duration it takes for a door to swing open or closed – is often overlooked during the framing process, but it significantly impacts the usability and safety of the space. Delays during the opening and closing of the door can impact traffic within the room.
The type of door hardware selected plays a crucial role. For example, self-closing hinges can increase closing time. Conversely, spring-loaded hinges can offer a faster closing time. The choice depends on the intended purpose of the door and the desired level of control over its movement. Furthermore, door closers, often used in commercial settings, introduce a controlled closing mechanism, and adjusting the closer's settings affects the closing time. The force required to open the door is also important, especially concerning accessibility.
The anticipated usage of the space is another key factor. In high-traffic areas, such as corridors or doorways leading to common areas, a faster closing time might be desirable to prevent drafts and minimize disruption. In private spaces, a slower closing time might be preferred to allow for more deliberate movement and reduce the risk of accidental collisions.
The physical characteristics of the user population should also be considered. Elderly individuals or individuals with mobility limitations may require more time to navigate doorways. Ensuring sufficient clearance around the door and selecting hardware that requires minimal force to operate can significantly improve accessibility and safety.
The impact of the "door opening and closing time" extends beyond the immediate doorway. The swing of the door can affect the placement of furniture, fixtures, and other elements within the room. A door with a long closing time that swings into a heavily used area can create a safety hazard and disrupt the flow of traffic. Therefore, careful planning is essential to optimize space utilization and minimize potential conflicts.
Securing and Inspecting the Frame
Once the frame is assembled, it must be properly secured. The top plate is fastened to the ceiling joists or framing members above. Use appropriate fasteners that are long enough to penetrate the ceiling framing and provide a secure connection. The sole plate is fastened to the subfloor or concrete slab below. When fastening to concrete, use concrete nails or screws specifically designed for this purpose.
Prior to installing sheathing, a thorough inspection of the frame should be conducted. Verify that all studs are straight, plumb, and properly aligned. Check that all connections are secure and that the frame is square. Ensure that the header is properly sized and supported. Rectify any defects or discrepancies before proceeding to the next stage of construction.
The diagonal bracing may be required, depending on the wall's length and structural requirements. Diagonal bracing provides additional stability and prevents the wall from racking or shifting. Bracing typically consists of wooden or metal straps running diagonally across the face of the studs and securely fastened to the top and sole plates. The location and installation of diagonal bracing should comply with local building codes.
The "door opening and closing time" is not fixed. The type of hinges used and door closers affect the closing time. Hinges require more frequent maintenance and lubrication to achieve consistent closure. The door closer need to be consistently checked as well. These will ensure the original time is maintained.
Electrical wiring and plumbing pipes often run within interior walls. Plan the location of these utilities before framing the wall and provide appropriate clearances and access holes. Avoid running wires or pipes through studs or headers whenever possible. If this is unavoidable, drill holes that are large enough to accommodate the wires or pipes without compromising the structural integrity of the frame. Protect wires and pipes from abrasion by using grommets or sleeves.
Finally, once the frame has passed inspection, sheathing can be installed. Sheathing, typically drywall or plywood, is fastened to the studs to create a solid wall surface. Sheathing provides additional structural support and a surface for applying finishes such as paint or wallpaper. Follow the manufacturer's instructions for installing sheathing, and ensure that all seams are properly taped and mudded.
Conclusion
Framing an interior wall, especially one with a door opening, requires careful planning, precise execution, and adherence to building codes. Paying attention to details such as stud spacing, header sizes, and door swing direction is crucial. Moreover, it is essential to consider the "door opening and closing time" and its impact on usability, accessibility, and safety. By following the steps outlined in this article, builders and homeowners can create structurally sound and functional interior walls that enhance the overall quality and value of the building.

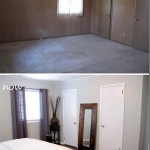
How To Build A Wall In An Existing Home Angela Marie Made

How To Frame A Wall With Door Part 2

How To Frame A Door Opening In New Wall

Framing A Door Part 2 In How To Build Wall Series Making Maanita

How To Frame A Wall With Door Opening Part 1

Wall Framing Primer

How To Build A Wall In An Existing Home Angela Marie Made

Step By Guide To Building A Wall With Door Buildworld

How To Build A Wall In An Existing Home Angela Marie Made

How To Build Panel An Interior Wall
Related Posts