How To Remove an Interior Wooden Window Sill
Removing an interior wooden window sill is a task frequently undertaken during window replacements, renovations, or when addressing water damage and rot. This process, while appearing straightforward, requires careful execution to avoid damaging the surrounding window frame, wall, and trim. Utilizing the correct tools and techniques is crucial for a successful and clean removal.
Before commencing any removal procedure, a thorough assessment of the window sill and its surrounding components is necessary. This evaluation will reveal the type of materials used, the method of attachment (nails, screws, adhesive, or a combination), and potential areas of concern, such as concealed wiring or plumbing. A clear understanding of these factors will dictate the appropriate removal strategy.
Safety precautions are paramount. Eye protection, such as safety glasses, is essential to prevent debris from entering the eyes. Work gloves will protect hands from splinters and sharp edges. A dust mask or respirator is recommended, particularly when dealing with older homes where lead paint or mold may be present. A drop cloth should be placed beneath the window to protect the flooring and facilitate cleanup.
The following steps detail a comprehensive method for removing an interior wooden window sill, ensuring a smooth and efficient process.
Preparation and Assessment
Prior to any physical removal, a detailed inspection is performed. Examine the perimeter of the window sill where it meets the window frame, the wall, and any interior trim or molding. Look for visible fasteners, such as nails or screws. Pay close attention to areas where caulk or sealant has been applied, as this will need to be carefully removed. Identify any evidence of water damage, as this can weaken the wood and make it more prone to splintering during removal. Photographing the existing window sill and its surrounding elements can be beneficial for reference during reinstallation or replacement.
Gather the necessary tools. These typically include:
- Safety Glasses
- Work Gloves
- Dust Mask or Respirator
- Drop Cloth
- Utility Knife
- Pry Bar (various sizes, including a small, thin pry bar)
- Putty Knife or Scraper
- Hammer
- Screwdriver (various types, depending on the fasteners used)
- Reciprocating Saw or Oscillating Multi-Tool (optional, for stubborn sills)
- Stud Finder (to avoid cutting into studs or electrical wiring)
Preparation also includes clearing the area around the window. Remove any curtains, blinds, or other window treatments. Move furniture away from the window to provide ample working space. The drop cloth should be secured to the floor to prevent slippage.
Cutting Caulk and Removing Trim
Begin by scoring the caulk or sealant along the perimeter of the window sill using a sharp utility knife. Run the blade along the joint where the sill meets the window frame, the wall, and any adjacent trim. This step is crucial for preventing the caulk from tearing away paint or drywall when the sill is removed. Make multiple passes with the utility knife to ensure a clean and complete cut.
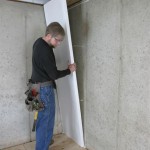
Carefully remove any interior trim or molding that abuts the window sill. This trim is typically attached with small nails. Use a small pry bar or putty knife to gently separate the trim from the wall and window frame. Insert the tool between the trim and the wall, and gently pry outwards. Work slowly and methodically to avoid damaging the trim. If the trim is painted, score the paint line with the utility knife before prying to minimize paint chipping.
If the trim is particularly stubborn, consider using a heat gun to soften the adhesive (if any) that may be holding it in place. Apply the heat gun in short bursts, and test the trim frequently to avoid overheating and damaging the wood. Once the trim is loose, carefully remove any remaining nails using a nail set and hammer, or by gently pulling them out with pliers.
Removing the Window Sill
With the caulk cut and the trim removed, the window sill is now ready for removal. Begin by inspecting the sill for visible fasteners, such as nails or screws. Remove any screws using the appropriate screwdriver. If nails are present, attempt to pull them out using pliers or a nail puller. If the nails are deeply embedded or difficult to remove, a nail set and hammer can be used to drive them through the sill from the top.
Insert a thin pry bar or putty knife between the window sill and the window frame. Gently pry upwards, working along the length of the sill. Apply even pressure to avoid cracking or splintering the wood. If the sill is particularly tight, use a hammer to tap the pry bar further in. Alternate between different points along the sill to gradually loosen it.
If the window sill is heavily adhered or fastened, a reciprocating saw or oscillating multi-tool may be necessary. Use a blade designed for cutting wood, and carefully cut through the sill close to the window frame. Make multiple cuts along the length of the sill to weaken it and facilitate removal. Exercise extreme caution when using power tools near the window frame to avoid damaging it.
Once the sill is loose, carefully lift it away from the window frame. If the sill is in multiple pieces due to damage or previous repairs, remove each piece individually. Inspect the area beneath the sill for any remaining debris, nails, or adhesive. Clean the area thoroughly using a scraper and vacuum cleaner.
If the window sill is particularly wide or long, it may be helpful to enlist the assistance of another person to help support the weight of the sill during removal. This will prevent it from falling and potentially causing damage or injury.
Addressing Difficulties and Complications
Occasionally, removing an interior wooden window sill can present unforeseen challenges. These may include:
Concealed Fasteners: Hidden nails or screws may be located beneath layers of paint or caulk. Carefully inspect the sill for any signs of these fasteners and remove them before attempting to pry the sill loose.
Stubborn Adhesive: Older homes may have window sills that are heavily adhered to the window frame or wall. In these cases, a heat gun can be used to soften the adhesive. Apply heat in short bursts and test the sill frequently to avoid overheating the wood.
Rot and Water Damage: Water damage can weaken the wood and make it more prone to splintering during removal. Use extra caution when prying the sill loose, and consider using a reciprocating saw or oscillating multi-tool to cut through the damaged areas. Wear a respirator to protect against mold spores.
Embedded Nails: Nails that are deeply embedded in the wood can be difficult to remove. Use a nail set and hammer to drive the nails through the sill from the top. If this is not possible, use a reciprocating saw or oscillating multi-tool to cut the nails flush with the surface of the sill.
Damaged Window Frame: If the window frame is damaged during the removal process, it may be necessary to repair or replace it. Small cracks or chips can be repaired with wood filler. Larger areas of damage may require more extensive repairs, such as patching or replacing sections of the frame.
Addressing these challenges requires patience and careful attention to detail. Avoid using excessive force, as this can exacerbate the problem and lead to further damage.
After the window sill has been successfully removed, it is essential to clean and prepare the area for a new sill or other repairs. Remove any remaining debris, nails, or adhesive. Sand the surrounding surfaces to create a smooth and even surface. If necessary, apply a primer to protect the wood and improve adhesion.
Proper disposal of the old window sill is also important. If the sill is in good condition, it may be possible to repurpose it for another project. Otherwise, dispose of it according to local regulations. If the sill contains lead paint, it should be disposed of as hazardous waste.
The removal of an interior wooden window sill, while seemingly uncomplicated, often requires a meticulous and cautious approach. By following the outlined steps and addressing potential complications with the correct tools and techniques, the process can be executed efficiently and safely. This will ensure a successful outcome, paving the way for window replacement, repair, or renovation.

Replacing A Window Stool And Apron Interior Sil

How To Replace An Interior Window Sill And Trim Craving Some Creativity

How To Replace An Interior Window Sill Two Purple Couches

How To Remove A Window Sill Windows24 Com

How To Replace An Interior Window Sill And Trim Craving Some Creativity

How To Make A Window Sill H2obungalow

How To Replace An Interior Window Sill And Trim Craving Some Creativity

How To Trim A Window Sill Exquisitely Unremarkable

How To Replace An Interior Window Sill Two Purple Couches

Window Sill Replacement How To By 1 800 Hansons
Related Posts