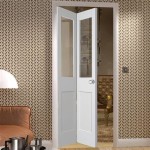
How to Install a 6-Panel Interior Door
Installing a new interior door can significantly enhance a room's aesthetic appeal and functionality. While seemingly complex, the process is manageable with the right tools, materials, and guidance. This article provides a comprehensive step-by-step guide for installing a standard 6-panel interior door.
Necessary Tools and Materials:
Before beginning the installation, gather the following tools and materials:
- 6-Panel Door Slab
- Door Frame (Jamb Kit)
- 2.5-inch Finishing Nails
- 16d Framing Nails
- Shim Set
- Hammer
- Drill
- Drill Bits (including a pilot bit)
- Measuring Tape
- Pencil
- Level
- Safety Glasses
- Hearing Protection
- Door Hardware (Handleset, hinges)
- Wood Filler
- Paintable Caulk
- Chisel
- Utility Knife
- Reciprocating Saw (optional, for trimming the door)
- Door Stop Molding (optional)
Step 1: Preparing the Doorway
Measure the width and height of the existing doorway. Ensure the new door and jamb kit are appropriately sized. If necessary, remove the old door and frame. Clean the doorway opening, ensuring a smooth and level surface for the new frame.
Step 2: Assembling the Door Frame (Jamb Kit):
Most pre-hung doors come with a pre-assembled jamb kit. If not pre-assembled, carefully fit the head jamb and the two side jamb pieces together, ensuring a tight fit at the corners. Secure the joints using finishing nails. Lay the assembled frame on a flat surface to maintain squareness.
Step 3: Installing the Door Frame:
Place the assembled frame into the doorway opening. Use shims to center the frame within the opening and to plumb and level it both vertically and horizontally. Start by shimming at the hinge locations. Ensure the frame remains flush with the finished wall surface on the hinge side. Temporarily secure the frame in place using a few finishing nails.
Step 4: Securing the Door Frame:
Once the frame is plumb and level, drive 16d framing nails through the jambs and into the wall studs. Ensure the nails are driven straight and flush with the jamb surface. Use shims as necessary to maintain the frame's position and prevent bowing. Remove any temporary finishing nails used earlier.
Step 5: Installing the Door Slab:
With the frame securely installed, carefully place the door slab into the frame. Ensure the door swings freely and has a consistent gap around all edges. Check the reveal (the gap between the door edge and the frame) for evenness. Make any necessary adjustments using shims behind the hinges.
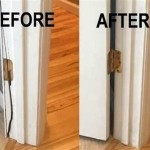
Step 6: Installing the Hinges:
Mark the location of the hinges on the door jamb and the door edge. Use a chisel to create shallow mortises for the hinge plates so they sit flush with the surface. Install the hinges using the provided screws. Ensure the hinge pins are properly aligned.
Step 7: Installing the Door Hardware:
Drill the necessary holes for the doorknob and latch mechanism according to the manufacturer's instructions. Install the doorknob and latch, ensuring proper operation.
Step 8: Finishing Touches:
Fill all nail holes and gaps with wood filler. Once the filler is dry, sand it smooth and flush with the surface. Caulk the seams between the door frame and the wall for a finished look. Apply paint or stain as desired. If desired, install door stop molding around the exterior of the frame to cover any remaining gaps and provide a finished appearance.
Step 9: Testing the Door:
Open and close the door several times to ensure it swings smoothly and latches correctly. Make any final adjustments as necessary.
Important Considerations:
Accurate measurements are crucial for a successful installation. Always double-check measurements before cutting or modifying any materials.
When working with power tools, always wear appropriate safety gear, including safety glasses and hearing protection.
If the doorway opening is significantly out of square or plumb, it may be necessary to consult a professional for assistance.
Pre-hanging the door in the frame before installation can simplify the process and ensure proper alignment.
Different door hardware may require slightly different installation procedures. Always refer to the manufacturer's instructions for specific guidance.

Easy Flat To 6 Panel Interior Door Makeover Joyful Derivatives

Easy Flat To 6 Panel Interior Door Makeover Joyful Derivatives

Easy Flat To 6 Panel Interior Door Makeover Joyful Derivatives

Easy Flat To 6 Panel Interior Door Makeover Joyful Derivatives

Easy Flat To 6 Panel Interior Door Makeover Joyful Derivatives

Diy Interior Door Makeover How To Upgrade Ugly Doors

How To Install An Interior Door Dana Vento

Master Makeover Diy Plain To Paneled Door Jenna Sue Design

Masonite 30 Inch X 80 Primed 6 Panel Hollow Core Textured Interior Door Slab The Home Depot

Internal Doors Guide Wickes
Related Posts