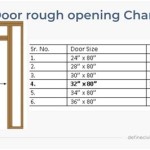
How To Install An Interior Door Jamb
Installing an interior door jamb is a crucial step in completing any home renovation or construction project. A well-installed door jamb not only enhances the aesthetics of your space but also ensures the proper functionality and security of your door.
Essential Tools and Materials
Step-by-Step Guide
1. Prepare the Doorway
Before installing the door jamb, ensure that the doorway is square and plumb. Use a level and tape measure to check the height, width, and squareness of the opening.
2. Assemble the Door Jamb
Locate the three sections of the door jamb kit (head jamb, two side jambs). Lay them on a flat surface and join them together using trim nails. Make sure the corners are at a 90-degree angle.
3. Install the Head Jamb
Place the head jamb across the top of the doorway and level it using a level. Secure it to the header using framing nails or a nailer.
4. Install the Side Jambs
Insert the side jambs into the slots on the head jamb. Align them vertically using a level and secure them to the studs using trim nails.
5. Check for Squareness
Once the jamb is installed, check its squareness using a level or a carpenter's square. Adjust the jamb as necessary until it is perfectly square.
6. Fill and Caulk
Use wood filler to fill any nail holes or gaps in the jamb. Once the wood filler dries, apply a thin bead of paintable caulk around the perimeter of the jamb, where it meets the drywall or wall.
7. Install the Door
With the jamb securely installed, you can now hang the door. Align the door hinges with the hinge slots on the jamb and secure them using screws.
8. Finish
Once the door is installed, paint or stain the door jamb to match the surrounding trim and walls.
Tips for Success
Conclusion
By following these steps and tips, you can successfully install an interior door jamb that will enhance the appearance and functionality of your home. Remember, proper installation is crucial to ensure the durability, security, and smooth operation of your door for years to come.

How To Hang An Interior Door Tips And Guidelines Howstuffworks

Installing A Prehung Interior Door Jamb Switch Rogue Engineer

How To Install Or Replace A Door Frame Homeserve Usa

Installing A Prehung Interior Door Jamb Switch Rogue Engineer

How To Install An Interior Door The Home Depot

Installing A Prehung Interior Door Jamb Switch Rogue Engineer

How To Install An Interior Door A Masonry Construction Howtospecialist Build Step By Diy Plans

Installing A Prehung Interior Door Jamb Switch Rogue Engineer

How To Install A Door For Wood Doors And Assembled Pre Hung Homestead Interior

How To Install An Interior Door A Erfly House
Related Posts