How to Build an Interior Wall with a Door
Constructing an interior wall with a door is a common home improvement project, allowing for the creation of new rooms, improved privacy, or enhanced traffic flow within a building. While the project requires some carpentry skills and attention to detail, it can be accomplished by a diligent homeowner willing to invest the time and effort. This article will provide a comprehensive guide to the process, outlining the necessary steps and materials to ensure a successful outcome.
Before commencing any construction, it is crucial to verify local building codes and regulations. Many municipalities require permits for structural alterations, including the construction of interior walls. Failing to obtain the necessary permits can result in fines or the requirement to dismantle the construction. Consult with the local building department to determine the applicable requirements and obtain the necessary approvals prior to starting the project. Furthermore, it is important to consider the location of existing electrical wiring, plumbing, and HVAC systems. Building a wall over these systems can create problems in the future, so it is advisable to relocate them before starting.
Planning and Preparation
The initial phase involves careful planning and preparation. This includes determining the desired location of the wall, measuring the space accurately, and gathering the necessary materials and tools. Accurate measurements are vital to ensure the wall is straight, plumb, and properly aligned with existing structures.
Start by marking the location of the wall on the floor. A chalk line is effective for creating a straight, visible line. Use a stud finder to locate existing studs in the adjacent walls to which the new wall will be attached. These studs will serve as anchoring points for the new wall's framing. Once the floor line is established, use a level to transfer the line to the ceiling. This ensures that the wall will be perpendicular to the floor and ceiling.
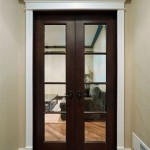
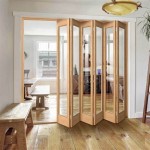
Next, determine the desired width of the door opening. Standard door widths are typically 30, 32, or 36 inches. Consider the intended use of the room and the size of furniture or equipment that may need to pass through the doorway. Add a few inches to the door width to accommodate the door frame, also known as the jamb.
Material selection is another critical aspect of the planning phase. The most common materials for framing interior walls are lumber, specifically 2x4 studs. Choose straight, dry lumber to minimize warping or twisting. Plywood or OSB (oriented strand board) is typically used for sheathing the walls, providing structural support and a surface for attaching drywall. For the doorway, you will need a pre-hung door or lumber to construct a door frame. Ensure all lumber used is of appropriate grade for construction purposes. Finally, drywall is used for the interior surface of the wall, providing a smooth, paintable finish.
The following tools are typically required for building an interior wall: a measuring tape, level, stud finder, chalk line, circular saw or hand saw, drill, hammer, screwdriver, drywall knife, drywall saw, and safety glasses. In addition, it might be useful to rent or use a nail gun to greatly speed up framing. Having all the necessary tools readily available will streamline the construction process.
Framing the Wall
Framing is the process of constructing the structural skeleton of the wall using lumber. This involves building a bottom plate, top plate, and stud arrangement that provides stability and support for the wall. The door frame is integrated into the wall framing during this stage.
Begin by cutting the top and bottom plates to the exact length of the wall. These plates will be attached to the floor and ceiling, respectively. Use pressure-treated lumber for the bottom plate if the floor is concrete or exposed to moisture. Secure the bottom plate to the floor along the chalk line, using concrete nails or screws if necessary. Position the top plate directly above the bottom plate, aligning it with the ceiling line. Attach the top plate to the ceiling joists or framing members using screws or nails.
Next, install the vertical studs. Standard stud spacing is 16 inches on center (OC), meaning that the center of each stud is 16 inches from the center of the adjacent stud. Measure and mark the stud locations along the top and bottom plates. Cut the studs to the appropriate length, ensuring they are slightly shorter than the distance between the top and bottom plates to allow for easy installation. Place the studs between the plates, ensuring they are plumb (perfectly vertical). Secure each stud to the top and bottom plates using nails or screws. Ensure studs are securely fastened to prevent future instability.
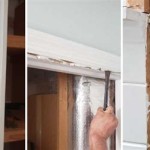
The door frame requires special attention during framing. The door frame consists of two vertical jambs and a horizontal header. The jambs are attached to the floor and support the header, which spans the width of the doorway. Construct the door frame according to the manufacturer's instructions if using a pre-hung door. If building the door frame from lumber, ensure the jambs are plumb and the header is level. The header should be sized appropriately to support the weight of the wall above the door opening. Install jack studs (also called trimmer studs) on either side of the door frame to provide additional support for the header. These jack studs run from the bottom plate to the header and are nailed to the king studs, which are the full-length studs that run from the bottom plate to the top plate.
Once the framing is complete, install cripple studs above the header if the wall continues above the door frame. These cripple studs are short vertical studs that are placed between the header and the top plate. Ensure the spacing of the cripple studs matches the spacing of the other studs in the wall to provide consistent support for the drywall. Check that all studs are aligned, plumb, and securely fastened to the top and bottom plates.
Sheathing and Finishing
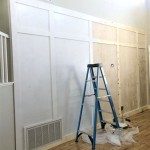
After the framing is complete, the wall is sheathed with plywood or OSB to provide structural support and a nailing surface for the drywall. The drywall is then installed, taped, and sanded to create a smooth, paintable surface.
Cut the plywood or OSB sheets to size, using a circular saw or hand saw. Attach the sheathing to the framing using nails or screws. Ensure the sheathing is flush with the framing members and that there are no gaps. Stagger the seams between the sheathing sheets to improve structural integrity. Apply construction adhesive to the framing members before attaching the sheathing for added strength. Sheathing greatly improves the rigidity of the wall.
Next, install the drywall. Cut the drywall sheets to size, using a drywall knife and drywall saw. Score the drywall with the knife and then snap it along the score line. Attach the drywall to the framing using drywall screws. Space the screws approximately 12 inches apart along the studs. Ensure the screw heads are slightly recessed into the drywall without tearing the paper facing. Be careful not to overdrive the screws, as this can weaken the drywall.
Once the drywall is installed, tape the seams and screw holes. Apply drywall tape to the seams using drywall compound. Use a drywall knife to spread the compound evenly over the tape, feathering the edges. Apply multiple coats of compound, allowing each coat to dry completely before applying the next. Sand the dried compound smooth, using a sanding block or drywall sander. Be careful not to sand too aggressively, as this can damage the paper facing of the drywall. Apply a final coat of compound if necessary to achieve a smooth, seamless finish.
After sanding, prime the drywall with a drywall primer. This will seal the surface and provide a better base for the paint. Apply two coats of paint, allowing each coat to dry completely before applying the next. Choose a paint color that complements the surrounding décor. Install the door hardware, including the doorknob, hinges, and strike plate. Follow the manufacturer's instructions for installing the door hardware. Ensure the door swings smoothly and latches securely. Finally, install trim around the door and along the base of the wall to conceal any gaps and provide a finished look. Caulk the trim to seal it to the wall and paint it to match the surrounding décor.
This process, while detailed, will result in a structurally sound and aesthetically pleasing interior wall with a door. Adherence to safety precautions, local building codes, and attention to detail are vital for a successful project.

How To Frame A Wall With Door Part 2

How To Frame A New Interior Wall Door Hunker Wood Doors French

How To Build A Wall In An Existing Home Angela Marie Made

Step By Guide To Building A Wall With Door Buildworld

How To Build A Wall In An Existing Home Angela Marie Made

How To Build A Wall In An Existing Home Angela Marie Made

Frame A Door Rough Opening Fine Homebuilding

Image Result For How To Build A Interior Wall Finishing Basement Remodel Bedroom

Connect Two Rooms With A New Door

Anatomy Of A Wall
Related Posts