How to Build an Interior Wall in an Existing Room with Carpet
Constructing a new interior wall within an existing room can significantly alter the function and aesthetics of a living space. This project, while achievable for DIY enthusiasts, requires careful planning, adherence to building codes, and precision in execution. The presence of existing carpet adds a layer of complexity that necessitates specific considerations to ensure a professional and lasting result. This article provides a detailed guide for building an interior wall in a room with carpet, addressing each crucial step from planning to finishing.
Before embarking on the physical construction, thorough planning is paramount. This involves defining the purpose of the new space, determining the wall's exact location, and verifying structural and utility considerations. Neglecting this phase can lead to costly mistakes and code violations, ultimately undermining the project's success.
Planning and Preparation
The initial step involves defining the wall's purpose. Is the new wall intended to create a bedroom, a home office, or simply to divide a large space? The intended use will influence the wall's required features, such as soundproofing, electrical outlets, and potential plumbing considerations. Once the purpose is clearly defined, the next crucial step is to determine the exact location of the new wall. Precisely measuring and marking the desired location on the floor ensures accurate alignment and avoids future complications. A laser level is a valuable tool for achieving accurate alignment, especially for longer walls.
Before committing to a specific location, it's essential to verify that the chosen location does not interfere with existing utilities. Electrical wiring, plumbing pipes, and HVAC ducts must be avoided or rerouted, and this can significantly increase the project's complexity and cost. Consulting with a qualified electrician or plumber may be necessary to assess the feasibility and cost of relocating any affected utilities. Furthermore, the structural integrity of the existing floor and ceiling must be assessed. The new wall will exert weight on the floor, and the ceiling must be able to support the wall’s top plate. If the floor or ceiling shows signs of weakness or instability, reinforcing them before construction is crucial.
Building codes and regulations vary depending on the location, and compliance is essential. Consult with the local building department to obtain the necessary permits and understand the specific requirements for interior wall construction. Common requirements include fire-resistant materials, proper insulation, and adherence to electrical and plumbing codes. Failing to comply with building codes can result in fines and mandatory alterations, so it is vital to prioritize compliance from the outset.
Finally, before any construction begins, gather all the necessary tools and materials. Essential tools include a measuring tape, laser level, circular saw, drill, hammer, drywall knife, and safety glasses. Materials typically include lumber for framing (studs, top plate, bottom plate), drywall, screws, nails, insulation, joint compound, and paint.
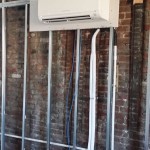
Framing the Wall
Framing is the skeleton of the wall, providing structural support and defining its shape. Accurate framing is essential for a straight, sturdy, and professional-looking wall. This process involves constructing the top and bottom plates, installing the studs, and ensuring proper alignment and securing.
The process begins with cutting the top and bottom plates to the desired length of the wall. The bottom plate will rest directly on the carpet, requiring careful preparation to ensure a secure and level base. Before placing the bottom plate, carefully cut away the carpet along the marked line using a utility knife. This creates a clean, flat surface for the bottom plate to rest on. Take precautions to avoid damaging flooring beneath the carpet. The top and bottom plates should be constructed from lumber of appropriate dimensions, typically 2x4s or 2x6s, depending on the wall's height and structural requirements. Secure the top plate to the ceiling using screws or nails, ensuring it is firmly attached to the ceiling joists. Locating the ceiling joists requires using a stud finder or carefully tapping along the ceiling to identify solid points.
With the top and bottom plates secured, the next step is to install the studs. Studs are vertical supports that provide the wall's primary strength. They are typically spaced 16 inches on center (OC), meaning the distance from the center of one stud to the center of the next is 16 inches. Measure and mark the stud locations along the top and bottom plates. Ensure the studs are plumb, meaning perfectly vertical, using a level. Secure the studs to the top and bottom plates using nails or screws. Check for squareness using a large square or by measuring diagonally across the frame. The diagonals should be equal to ensure the frame is square. Additional framing may be required for door openings, window openings, or other features. These openings require headers, which are horizontal supports that span the opening and distribute the weight of the wall above. Accurate framing around openings is crucial for proper door and window installation.
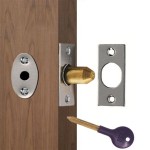
For walls requiring electrical outlets or switches, prepare the framing to accommodate the wiring. Drill holes through the studs to run the electrical wiring, ensuring the holes are large enough to accommodate the wires without squeezing them. Consider the placement of electrical boxes and ensure the framing provides adequate support for them. Prior to installing drywall, inspect the framing to verify everything is square, plumb, and level. Make any necessary adjustments to ensure the frame is solid and ready for the next stage.
Insulation is crucial for soundproofing and energy efficiency. Installing insulation within the wall cavity helps to reduce noise transmission between rooms and maintains a comfortable temperature.
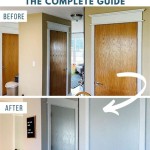
Installing Drywall and Finishing
Drywall installation involves attaching drywall sheets to the framed wall, creating a smooth surface that can be painted or wallpapered. This process requires careful cutting, fitting, and securing the drywall sheets to the studs. Correct mudding, taping, and sanding are essential for a seamless and professional finish.
Measure and cut the drywall sheets to fit the framed wall, using a utility knife to score the drywall and snap it along the score line. For larger sheets, a drywall saw may be necessary. When cutting drywall around openings, ensure the cuts are precise and clean for a professional look. Attach the drywall sheets to the studs using drywall screws, spacing them approximately 12 inches apart. Ensure the screws are driven in straight and do not tear the paper facing of the drywall. Butt the drywall sheets tightly together, leaving a small gap for joint compound. Avoid overlapping the drywall sheets, as this will create an uneven surface.
Once the drywall is installed, the next step is to apply joint compound to the seams and screw holes. Apply a layer of joint compound over the seams, embedding drywall tape into the compound. The tape reinforces the seams and prevents cracking. Apply multiple coats of joint compound, allowing each coat to dry completely before applying the next. Feather the edges of the joint compound to create a smooth transition between the taped seams and the drywall surface. After the joint compound has fully dried, sand the surface smooth using a drywall sanding sponge or sanding pole. Be careful not to oversand, as this can damage the paper facing of the drywall.
Once the drywall is sanded smooth, prime the entire wall surface with a drywall primer. Primer seals the drywall and provides a uniform surface for painting. After the primer has dried, paint the wall with the desired color and finish. Apply multiple coats of paint for a durable and professional-looking finish. Pay attention to the corners and edges, ensuring they are evenly coated. Once the painting is complete, install trim around the base of the wall and along the ceiling to create a finished look. Trim can be painted or stained to match the wall or other elements in the room.
Addressing the Carpet Issue
Dealing with the carpet presents a unique challenge. The primary concern is ensuring the bottom plate of the wall is securely anchored and does not compress the carpet over time, leading to instability or an uneven appearance. There are several approaches to address this issue.
As previously mentioned, the most common approach is to cut away the carpet along the planned wall line before installing the bottom plate. This provides a solid, flat surface for the bottom plate to rest on. However, this leaves a visible gap along the base of the wall where the carpet was removed. This gap can be covered with baseboard trim, but careful attention must be paid to properly attach the trim without compressing the surrounding carpet.
An alternative approach involves using shims to level the bottom plate on top of the carpet. This method is suitable for carpets with a low pile and involves placing shims underneath the bottom plate to ensure it is level and stable. The shims distribute the weight of the wall evenly across the carpet, minimizing compression. This approach requires more careful measurements and adjustment to ensure proper leveling. A combination of cutting back the carpet and using shims may provide the best outcome.
Finally, consider using a pressure-treated bottom plate for added protection against moisture. Although unlikely in an interior setting, pressure-treated lumber is resistant to rot and decay, which can be beneficial in areas with high humidity. It ensures the bottom plate remains stable and structurally sound over time. Remember that pressure-treated wood requires special handling and disposal due to the chemicals used in the treatment process. Always wear gloves and a mask during cutting and handling.
Building an interior wall in an existing room with carpet is a multifaceted project that demands careful planning, precise execution, and an understanding of building codes. By following these steps, individuals can successfully transform their living space while mitigating the challenges posed by existing carpet.

How To Build A Wall On Top Of Carpet Ehow

Wall To Carpet Everything You Need Know The Workroom

How To Build An Interior Wall Rona
:strip_icc()/ScreenShot2020-11-25at11.26.41AM-70cf4eb4231a4c098350fd9613e4f533.png?strip=all "How To Layer An Area Rug Over Existing Carpeting")
How To Layer An Area Rug Over Existing Carpeting

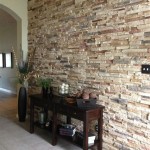
Role Of Carpet Flooring In Enhancing Room Decor

Stylish Ways To Conceal Your Dingy Wall Carpeting

Living Room Carpet Design Ideas For Every Style Cafe

3 Of Our Favorite Beige Carpet Living Room Ideas Cave

How To Build A Soundproof Room Within Cow

Wall Colours With Beige Carpet Advice Please Houzz Au
Related Posts